1099 / W-2 Important Announcment
IRS has announced that anyone filing more than 10 forms (W-2 & 1099) are required to file electronically. Ultra is not capable of electronic filing. Printing working copies is suggested. To solve this problem consider using Nelco Solutions (nelcosolutions.com).
- 1099 NEC 3 forms per page
- 1099 Interest 2 forms per page
- 1099 Rent 2 forms per page
- Profit & Loss Report: Fixed the sometimes Enterprise Income missing. Now Alternating Reports Match Legacy Reports.
- Cash Flow Planning Input: Changed the sorting sequence so the top matches the lower portion audit list.
Tax Tables: Federal 2024, AR, MN, OH, ND, IA, IL, IN, NE, WI, UT, MO were updated as of August 1, 2024.
Includes All Improvements Made in Version 7J (released November 2023)
Money Borrowed~~General Vendor ~~Reports Added!- Shaded backgrounds offer 12 different color selections.
- Easier to read across the page with these enhancements.
- Uses new Print/Preview Toolbar offering more options for printing.
- Easily print all pages or just a range of pages. Print both sides to save paper.
- Choose “FITS” for full page on screen or “ZOOM” to enlarge 150% or 200%.
Some customers have experienced sluggish performance when attempting to enter Monthly Transactions. If you experience this, you may find LIMITED DATA ENTRY a satisfactory alternative.
The limitations are as follows:
- No Payroll or Points (Sub-Accounts) can be used.
- No Adding a vendor on the fly. You need to add vendors by going to Vendors to add a Vendor.
- Vendor Preferences are available only for General Vendors.
- General Vendors & Money Borrowed Vendors must not use the same Vendor ID Code.
- No Check Writing.
This method utilizes one CASH tab for both Expense & Income. The Item Codes 300-599 determine Income and Items Codes 600-899 determine Expense. When using Limited Data Entry, the INPUT INFORMATION screen will show...
1. LIMITED <><><><><><> DATA ENTRY. To change the settings~ Main Menu > 7. More Options > 2. Systems Configuration > 9. Limited Data Entry > Yes/No
Switching between the current procedure and LIMITED DATA ENTRY can be executed as often as needed.
When ready to print the Detail Transaction Report, click the Customize Report icon. Under the Blinking ‘Reports with alternating background’ we’ve added a check box to request an export of the Excel file.
The Exported file will contain the very same data that made up the report. If your report included just selections, then the Excel file will contain just the selections.
Cash Flow Actual, Profit and Loss, Schedule F Worksheet: These 3 reports are modified to use the new format with alternating line background colors.
1099 NEC (Non-Employee Compensation): New Government required form is ready for use.
Tax Tables: Federal Tax Tables for 2020 plus State Tax Tables for the following states. MN, ND, IL, OH, IA, MO, were updated as of Aug 1, 2020
Includes Improvements made in Version 7E (released December 2019)
- Prints Much Faster. Every other line has a shaded background.
- Shaded backgrounds offer 12 different color selections.
- Easier to read across the page with these enhancements.
- Uses new Print/Preview Toolbar offering more options for printing.
- Easily print all pages or just a range of pages. Print both sides to save paper.
- Choose "FITS" for full page on screen or "ZOOM" to enlarge 150% or 200%.
- Item Code totals print bold. Extra asterisks make totals easier to locate.
- Quantities & Amounts are formatted with commas & decimals so it's easier to read.
- Now available with shaded background for the following:
- Detail Cash Transactions Report.
- Check Register Report
- General Vendor Selection List
- Money Borrowed Vendor Selection List
- Labor Vendor Selection List
- Personalized Item Codes
- Personalized Enterprises Lists
- Checkbook Reconciliation List.
- Select your choice of 12 background shading options.
- Main Menu > More Options > System Configuration > Printing Options > Use Alternate Background.
- Changed Mark All/Un-mark All to be clickable, you can still use F7/F8
- Made the PRINT button utilize the new Print/Preview Toolbar
- Three options to print the list in a different order
- The Minnesota Dept. of Labor is requiring employers to provide additional information on the employee' pay stub. We added a form in payroll maintenance to input the info you want to show on the stub., If you don't live in Minnesota you can opt not to use this feature.
- Federal Tax Tables for 2019 plus State Tax Tables for the following states: MN, ND, IL, OH, IA, UT, and MO were updated as of Aug. 1, 2019.
- Much easier to make changes.
- The Audit list is now in order by Item Code & Enterprise.
- The Search button is activated, just enter the Item Code you want to change.
Includes Improvements made in Version 7D (Released December 2018)
- Has quantity & unit price and automatically calculates the extended amount
- Handles both full & partial payments.
- Interacts with accounting when payments are made and updates monthly transactions
- Keeps a master list of products & services.
- Can handle discounts & shipping charges
- Computes sales tax
- Computes interest charges on past due accounts for statements
- Prints an Invoice with the farm logo.
- Fits in a window envelope.
The Billing Data Entry has Dates, Invoice Number, and Vendor layout the same as Monthly Transactions. The bottom of the screen has the familiar buttons for Add New, Forward, & Back, etc.
You choose a Transaction TYPE and then pick an existing item from the drop down list or enter a new item. Enter the quantity. The Unit Price from the master list is used to calculate the amount. Of course you can override the Unit Price and Dollar Amount.
Payment Distribution: These 3 columns are the same as in your accounting. They can be left blank until a payment is made. You have the option of consolidating all items into one item code by entering the item code that should receive the Total Invoice Income in the “Total Distribution Only” item code box.
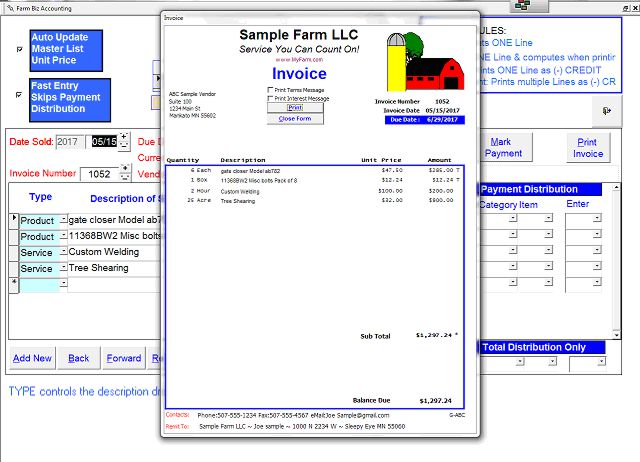
The Checkbook balances are shown and update after you Mark a payment received.
The Invoice is designed to fit on one 8-1/2 x 11 page. Custom features are restricted to the selections on the Billing Configuration Screen. When correctly folded it fits nicely in a window envelope.
Both the Packing List and the Bill of Lading print the same as an Invoice except for removing the Unit Price and extended dollar amounts.
The above illustration is a screen shot, however the printed page does not show the check mark for the Terms Message, the check mark for the Interest Message, the button to print, and the button to close.
All other information in the screen shot prints.
Includes Improvements made in Version 7C (Released November 2017)
Tax Tables: Federal 2017 & MN, ND, IN, NC, NE, CO were updated as of Aug. 1, 2017.
A new Vendor option on the Data Entry Screen: Some customers asked for the cursor to stop on the Vendor Name instead of the Vendor ID. If you double click on the Vendor Name input box, it will turn yellow, this is your visual queue that when you key the Vendor Type, the cursor will stop on the Vendor Name. Double Click again to turn this feature off, then the cursor will go back to stopping on the Vendor Id.
Deposit Number to stay Blank? When you choose the option “Allow Deductions!”, this refers to keying an Expense on the Income Screen. The program automatically inserts “>MMDD” in the Deposit Number, this is to inform you that this expense was keyed on the Income Tab. Where “>MMDD” stands for a less than sign followed by the Month and Day the transaction was made. Some customers want to keep the deposit number blank. If you double click on the Deposit number, it will be locked & the field will turn blue. This prevents “>MMDD” from automatically showing in the deposit number. You can still key in a Deposit Number but nothing will be automatically inserted by the program. Secondly, if you are using the billing module, the Date you mark an Invoice paid will not automatically insert the date paid. Double Click again to turn this feature off.
Includes Improvements made in Version 7B. (Released December 2016)
Search the entire year Detail Transactions.
Now you can search all checkbooks for transactions in the entire year. The search criteria includes Item Code, Enterprise Code, Vendor ID, Money Amount, Check\Deposit Number, and Item Description.
The Search feature is always displayed at the bottom of the Data Entry Screen. The search is only on the TAB selected (Income tab, Expense, or Payroll tab, etc.). When you enter search criteria and click Find, the first Data Entry Screen with a match and the total number of matches remaining is displayed. You can make a correction or just click the Next button to display the next record with matching criteria.
Unable to minimize the Monthly Transactions Screen.
This feature was taken away with Version 7A and reinstated with Version 7B.
Unable to Copy/Paste while in Monthly Transactions.
A new Tool bar was added to all screens used for data entry. Use the Copy/paste Icons shown above. This feature facilitates copying data from say a bank statement to your Ultra Farm.
After printing a report, and having the Report Printing Menu in view the ESCape Key locked up. The Escape Key now goes back to the Main Menu.
Check Writing #6 on the Main Menu.
Entering new wages were not showing up in the list of wages to be paid.
Income Transactions without a vendor type/code did not show in the View List.
The type & code can now be left blank & the Item/Category description will show.
Report Printing and error "Invalid use of Null". Blank dollar amounts can now be used on an Income Deduction transaction.
Tax Tables: Federal 2016 & MN, ND, NC, IL state tax tables were updated as of Aug. 1, 2016.
Includes Improvements made in Version 7A. (Released December 2015)
The Income screen is expanded to include all the Expense Item codes.
This expansion provides a method to handle input for crop & livestock check-offs, advertising, storage and any other expenses that are used to reduce the amount received from a sale. This makes the check amount equal to the net deposit amount even if the sale amount was greater.
Version 7A automatically defaults to Allow for these deductions. When on the “Income” screen, under the “Checkbook ID” you will see a peach color box specifying “Allow Deductions!”. While this feature is active you can click Item Code Control to restrict Item code entry to either Income or a mix of Expense & Income.
No need to flip over to the Expense Screen for these deductions. Just key the deductions on the Income screen and they will reduce the deposit to match the net check amount.
Version 7A is compatible with Windows 10.
Tax Tables: Federal 2015 & MN, ND, WI, OH, IL state tax tables were updated as of Aug. 1, 2015.
Includes Improvements made in Version 6G (Released December 2014)
Locate & Display contents of Removable Drives:
When you are on the Load/Save Menu there is a new button option number
5 Removable Backup Choices. All removable drives are listed with a snapshot of the files stored on them. This feature facilitates Saving & Recovery of your data from removable media.
Automatic Payroll & Withholding Tax Calculations:
-
Federal Tax Calculations are based on the Labor Vendor Screen for the Employee's Pay Frequency, Marital Status, and Number of Federal Exemptions Claimed. You should Match your W-4 Employee Withholding's forms with the Labor Vendor Screen for each Employee, to verify that each is setup correctly.
-
State Tax Calculations are enabled for Illinois, Indiana, Iowa, Minnesota, Nebraska, North Dakota, Ohio, Utah, and Wisconsin. The calculations are based on the Vendor Screen for the Employee's Pay Frequency, Marital Status, and Number of State Exemptions Claimed.
(Tax Calculations are available upon request for other States!)
City or County Taxes are not computed. If required, you may want to decrease the number of State Exemptions to estimate the additional tax for city or county.
-
Gross Pay is determined by multiplying the Employee's Pay Rate times the Regular Hours worked. Overtime hours are computed at 1.5 times the Pay Rate. For example if the Pay Rate is $10, then Overtime would be calculated by Multiplying $10 time 1.5, in this case that would be $15 as the Rate of Overtime Pay. The overtime pay rate is multiplied times the Hours.
CB Reconciliation:
We added a sort button to the list. The original sort order was by date. An alternative sort by Check Number is now offered.
Windows 8 Screen Freeze:
Press F11 Function Key to redraw the screen if it freezes while loading. The REDO Icon in the upper left corner of the screen can also be clicked, if available.
Includes Improvements made in Version 6F. (Released December 2013)
Backup your data with verification:
Now when you save your data to removable media you have an option to visually verify your transactions. A new Save & Verify button saves the data just like in the past. When finished with the save a new screen requires you to remove the media, then reinsert the media. Your data will be automatically loaded from the removable media into the Checkbook data Entry format for you to confirm its accuracy. Feel secure with your backups now.
Vendor Name into the Item/Category:
When the Favorites for Vendors are in view, a Double click on the vendor name will put the name into the Item/Category cell. Then the Item favorites are displayed. A click on Item Favorites inserts the Item code then puts the cursor on $ amount. Saves time!
Stop Check Incrementing:
A new Check box (above fast entry) on the Checkbook Data Entry screen enables/disables the automatic incrementing of the check number.
Screen Freeze on Windows 8:
All screens were optimized for Window 8. Additionally, a REDO Icon was placed in the upper left corner on all screens. Its' purpose is to redraw the screen in the event of a partial screen freeze. The REDO button is only active when using Windows 8.
Vendor City/State/Zip:
These drop down list boxes are now more friendly to use.
Item Code Points Expanded:
In case you exceed the previous A-Z and 0-9 (36) sub-accounts, we expanded the acceptable characters to include special characters like the @, #, $, &, etc.
Includes Improvements made in Version 6E (Released December 2012)
Includes Improvements made in Version 6A (Released January 2009)
Yes! This phenomenal update will save you 50% or more in time every month. It'll save you oodles and oodles of hours for the year.
Vendor preferences are automatic transactions that are recalled only when you want them. Each vendor can store the monthly transactions used most often for that vendor. You can specify a percentage to calculate and split an amount into multiple transactions. For example: the split between farm & personal electricity.
If you pay a fixed amount to a vendor every month you can specify the transaction as Dollars. For example: pay your Cable/Satellite Provider $43.50 each month. You could select Dollars and enter your Description and Item Code, and enter $43.50 for the Dollar Amount. Then when you enter Monthly Transactions the Dollar Amount is automatically input as $43.50.
The other way to Code a transaction like this is to select Percent, enter the Description and Item Code, and enter 100 for the Percentage. Using Percent will require you to enter the Total Dollar Amount when you add this transaction in monthly. Use Percent when the Monthly Amount frequently changes, for example the Cable or Satellite Bill. Frequently when you rent a special Movie, or Sporting Event, this changes the Monthly Bill on these occasions. So by making the percentage 100% it takes the Total Dollar Amount entered, and applies it to the individual transaction.
Auto Bill Pay with Vendor Splits!
Ultra Farm includes the ability to input the monthly transactions routinely used for each vendor in the Vendor Screen under Vendor Preferences. The Money Borrowed and General Vendor Data Entry screens have changed to look like this. This example illustrates the use of percentages.
Multiple transactions can be input for a vendor. These transaction will be used to automatically input this information into Monthly Transactions and Accrual Transactions.
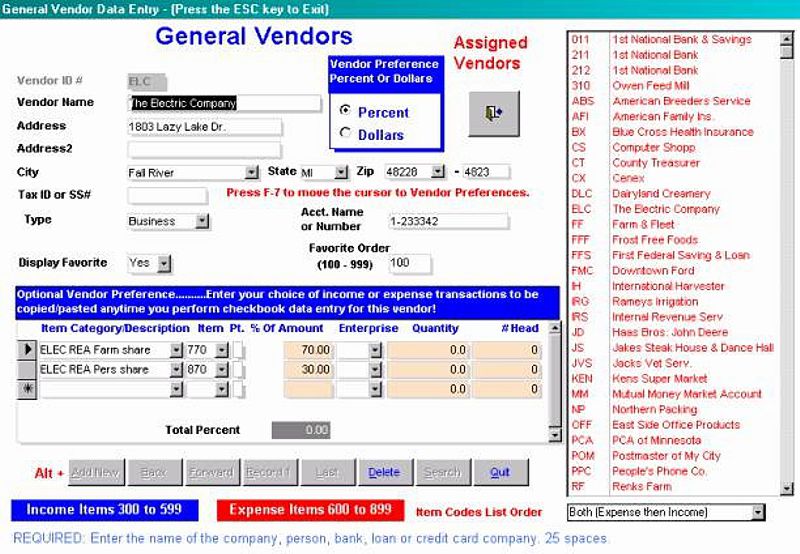
This will apply 70% of the total bill for the Farm Electric transaction and 30% for the Electric Personal Share.
Auto Bill Pay With Vendor Splits
The next example illustrates the use of fixed dollar amount vendor preferences.
Single or multiple transactions can be input for a vendor.
Vendors normally used for Income can be setup too!
Vendors with Preferences can be used in Payables & Receivables as easily as in Monthly transaction!
Tip: For cable or Dish TV service, you could enter only one transaction with the monthly dollar amount. Then when you do your Checkbook Data Entry, just enter the vendor ID and click Vendor Split, then you will be finished inputting that check.
You can see this is a huge time saver!
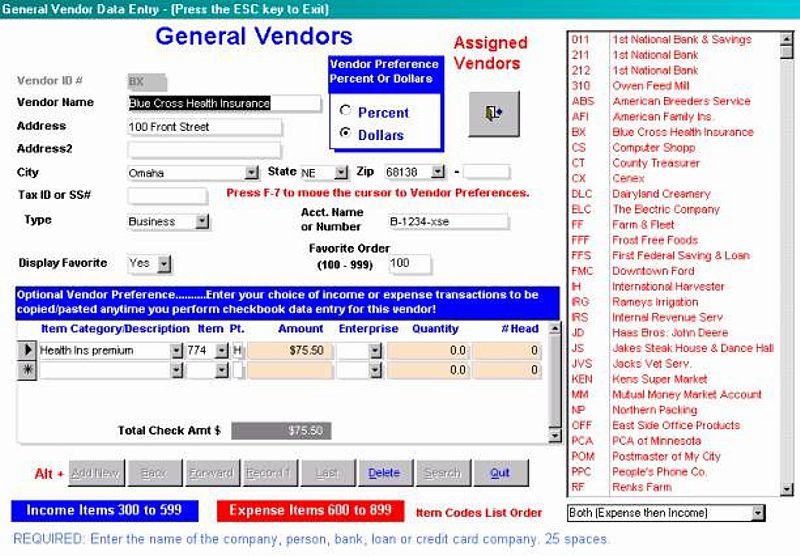
This Vendor uses a fixed dollar $ amount for the monthly health insurance premium. When the Vendor ID is entered in monthly input you will only need to click the Vendor Split button to have the remainder of the transaction entered automatically.
WOW! Press only 2 or 3 keys for the vendor ID and click a button to input the monthly transaction. Now that's what I call a real time saver!
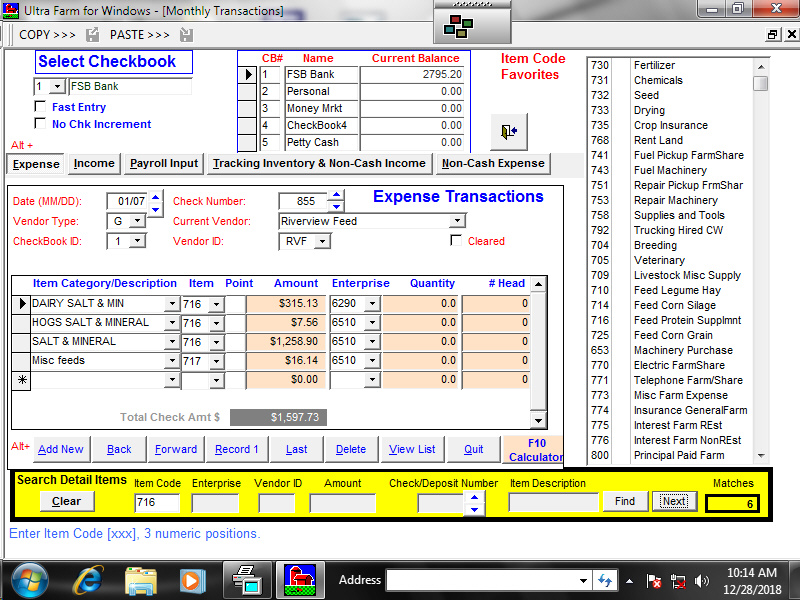
Auto Fill Percentage Transactions based on Vendor!
The Monthly Data Entry screen also changed to look like this. This example illustrates the use of a vendor preference previously setup using percentages.
Pick the vendor from the list or enter the Vendor ID.
Then input the total check amount for this vendor in the yellow box.
The blue box displays $ Dollars to split the yellow box appears when a percentage vendor is chosen. In the yellow box enter the total dollar amount that will be split for this check.
Auto Fill Percentage Transactions based on Vendor!
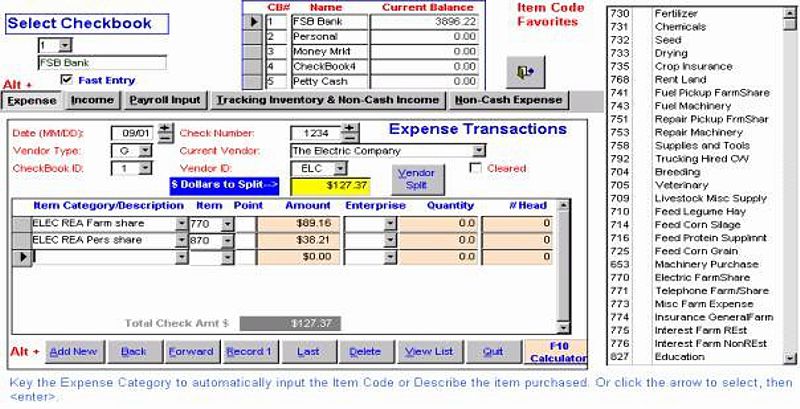
As soon as you click on the "Vendor Split" button the Item Category Description, Item Code, Enterprise, Quantity and # of head is copied from the Vendor preferences into the monthly Checkbook Data Entry Screen. The amount calculated is based upon the percentages specified on the Vendor screen. In this case, 70% is used for the farm share and 30% for the personal share.
Multiple transactions can be copied with just one click of the "Vendor Split" button.
If a vendor is picked that should not use any of the preset transactions, that's not a problem. Just DO NOT click the "Vendor Split" button, instead begin to enter data as usual.
Auto Fill Fixed dollar based on Vendor!
The Monthly Data Entry screen looks like the sample below. This example illustrates the use of a vendor previously setup with fixed dollar amounts.
After selecting the Vendor, notice the differences in the Monthly Transaction Screen.>
Note: The Yellow box does not appear but the blue box under the "Vendor ID" has changed the message to read Using $ Values.
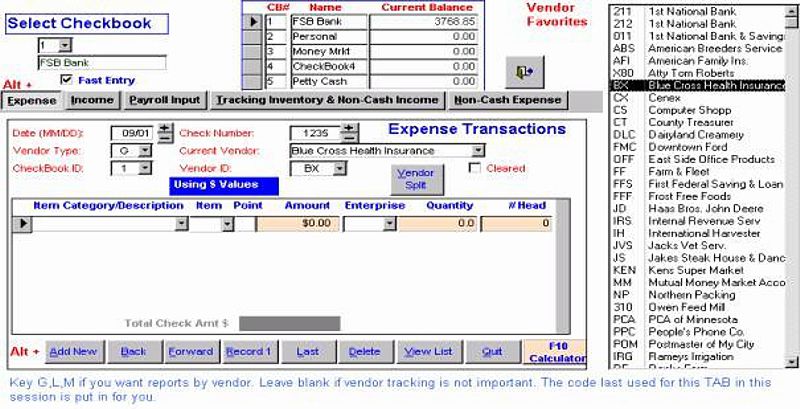
The sample above illustrates a vendor that used a fixed dollar amount. After entering the vendor ID (BX), No other input is required to complete this transaction.
Only a click on the Vendor Split button is needed. (The results follow).
Auto Fill Fixed dollar based on Vendor!
The transaction is copied from the Vendor preferences and put into the monthly Checkbook at the time the button "Vendor Split" is clicked.

As soon as you click on the "Vendor Split" button the Item Category Description, Item Code, Item Point (H for Harry), Quantity and # of head is copied from the Vendor preferences into the monthly Checkbook Data Entry Screen. The amount is transferred directly from the Vendor Data Entry screen.
The transaction shown above can be changed in any way or deleted, if you change your mind. If a vendor is picked that should not use any of the preset transactions. Just DO NOT click the Vendor Split button instead begin to enter data as usual.
Investigate the New Vendors Print Report Listings:
There are Two new Vendor List Reports, plus the old Complete Name and Address List has been modified to be more user friendly. You can now print any of the Vendor List Reports to the Screen or Printer instead of just the printer.
Vendor Name prints one line per Vendor.
Vendors with Preferences Only - prints Only the Vendors that use Preferences. Each Vendor is printed on a separate line with the Item/Category Description, Item Code, plus the $ Amount or % Percentage is also listed.
View/List:
On Monthly Input, some customers when they did not enter a Vendor type experienced a blank instead of the vendor name or Item Category on the View/List. However the vendor name or the item category would show correctly when printing reports. A change was made to version 6E to prevent blanks from showing on the View/List when the vendor type is not specified.
CB Reconciliation:
To make this activity take less time we added the ability to "Mark All" (clear all) by pressing the F7 key. If there are a few checks still outstanding you can scroll to them & click the box so they are not cleared. Conversely we added "Unmark All" (Not Cleared) by pressing the F8 key. Again if you want to clear a few you can scroll to them & click the box so they are cleared.
Checks not cleared from the prior year can now be deleted so they don't affect this years Bank Statement balancing.
You can utilize the "F7 Mark All" or "F8 Unmark All" or selectively delete a particular item to balance to your bank statement.
From the Main Menu >7. More Options > 4. Trouble Shooting > 7. Clear Last Year CB Recon.
Accounts Payable:
The Due Date was not always bringing forward the most likely date when Add/New was clicked.
The Date Acquired sometimes would change when flipping between View/Edit & View/List.
Includes Improvements made in Version 6D (Released December 2011)
Payroll FICA & Medicare Percentage: Two new fields for the employer share were added on the Farm Name Screen. Now the employee and the employer can have different percentage calculations. This remedied the temporary 2011 procedure to handle unequal percentages.
The View/List sort order is remembered between sessions. CB Reconciliation:A new option to clear all prior year records with ONE click is in More Options > Trouble Shooting.
If you used Multiple Checking Accounts the balances would incorrectly keep changing. Now fixed.
Fiscal year farms now list the reconciliation in date order of your fiscal year instead of the calendar year.
An automatic backup is made every time you select this feature. To rescue & use this copy contact our office. Accounts Payable:
The Due Date was not always bringing forward the most likely date when Add/New was clicked.
The Date Acquired sometimes would change when flipping between View/Edit & View/List.
External Number Pad on laptops: If you were getting an error message that the "Num Lock" key was pressed, contact us for the work around.
Automatic Backup: Each time you enter Checkbook Reconciliation we make a backup of your data. This is not a substitute for you to make a backup on a USB flash Drive. Never! Never! Never! pull the flash drive out while the computer is on unless you click the safely remove media icon and a message appears that it's Safe to Remove USB Mass Storage Now.
Printing Problem:The Money Borrowed report had an occasional missing last line on some ink jet printers. Now corrected.
Includes Improvements in Version 6C (Released November 2010)
License Do-Over:
Because of anti-spyware like Norton, Webroot Spy Sweeper, AVG, Trend Micro, MacAffe and others we abandoned the license technique we have been using for a number of years. No longer will you need to send in your site code to receive a site license. The new method is guaranteed to not conflict with your anti-spam software.
Color Screen Support:
Each farm or each year on your computer can be set to a background screen color. For example when you close the year 2011 to 2012, you can go back to 2011 and change the color so you are less likely to accidentally input your data into the wrong year. You can also change the color of the new year 2012. If you do Cash Flow Plans from Actual, then definitely change those upcoming years to a different color, this way you won't get changes into the wrong year.
Sorting the View List for Monthly Transactions:
Everyone has their preferred sort the list technique. Some customers liked the sorting used in version 6A, others like the sorting in version 6B. We added a new sort so there are 6 variations to pick from now. Hopefully the variations offered will arrange the transactions in the order you want.
Includes Improvements made in Version 6B (Released December 2009)
Windows 7 Compliant: Version 6B is Windows 7 compliant. Printing Problem: Last year we notified our customers regarding some ink jet printers failing to print the last two lines on the “Detail Transaction Report”. This problem was corrected in version 6B and tested in version 6A.6.
Printing Dates for Fiscal Years: The beginning & ending dates for report printing were frequently displaying the wrong year when the Report screen was first displayed. This problem is corrected in version 6B.
Checkbook Reconciliation: Checks from last year that cleared after January of the new year caused the beginning balances to be wildly incorrect. This problem was corrected in version 6B and tested in version 6A.6.
Vendor Favorites: In “Monthly Transactions”, the vendor favorites now display as soon as a “vendor type” is entered. The vendor favorites stay displayed when the Forward & Back buttons are clicked. This change was added to Accounts Payable & Accounts Receivable too.
Accounts Payable: Some customers experienced a year of “1899” for the “Due Date”. The due date logic has been changed and will not show 1899 anymore.
Sorting Monthly View List Transactions: The sort by check number (the bottom choice in the sort box) was changed as follows: Checkbook Number (1-5), Check number, Date. If no check number was entered then the transactions will be in date order for each checkbook. We attempted this change in version 6A, but we did it wrong.
Assigning the removable drive letter: This new feature is found in More Option, System Configuration, Backup Options, Assign Different Drive Letter. This feature was implemented to facilitate assigning a removable drive letter on new installs on new computers. You can still assign a new drive letter in Load or Save a farm.
Includes Improvements made in Version 6A (Released January 2009)
Dynamic Screen Redraw: When screen settings of 1024 x 768 or higher are used, the Ultra Farm menus would display smaller in the upper left corner of the screen. The change implemented in version 6A keeps the menus and text large as though the screen resolution is set to 800x600 even though it isn’t. This change enables touch screen users a larger target area for faster inputting.
E-mail your Data: When you backup your data compressed (zipped) to a USB memory stick we make a duplicate copy on the stick. The file name is “yyyy_FBM_FarmName.txt”. (yyyy = year). When you want to send your data to your Tax Accountant or Farm Management Instructor, you can send this file as an attachment. Look for it on the stick in the folder “Backup_UltraFarm”. Your instructor will need to contact us for the proper procedure to import your data onto his computer.
Monthly View List Sorts: When sorting by vendor, vendor names that were the same should have sorted by date too! So now all checks for the same vendor are sorted by date also. Fixed in Version 6A.
Check Number Spinner: When clicking the up/down arrows to change the check number, then click Add New, the new check number was incorrect. (But if the + and – keys were used it was correct.) Now fixed.
Calendar on more screens: Added the calendar for the due dates on Accounts Payable, Accounts Receivable and Wages Payable.
Inventory Category Missing: Category 163 Stocks & Bonds was missing from the Investments category list. Now included.
Accounts Payable Due Date: The last due date keyed was not carrying forward to the next session. Now fixed.
Check Writing: On Payroll check stubs the date printed was always today's’ date. Even when the check date was different, the stub still printed the computer date. This is now fixed in version 6A.
Includes Improvements made in Version 5G (Released January 2008)
Windows Vista Compliant: Fixes the conflict when certain versions of Microsoft Office would cause Ultra Farm to terminate because of a license conflict with Microsoft Office.
Calendar for Report Printing: Entering report period beginning & ending dates is now easier with a popup calendar.
Export / Import Months from/to a different Farm: It’s now possible to keep separate tax years and crop years by moving the data from one farm to another. It’s even possible to have another farm that always has the most recent rolling 12 months no matter when your tax year ends.
Globally replace Enterprise Numbers: Sometimes you discover that you did something wrong for the whole year. Frequently this involves Enterprising. The following circumstances can save you considerable time fixing your mistake.
You can pick an Item that should have an enterprise code if previously blank. You can pick an Item that should always have the new enterprise code. You can pick an Item that you want the Enterprise code blank. You can pick an Enterprise code & change it to another code or blank it.
Balance Sheet Beginning of the new year Report: Versions 5F and earlier picked up the January 31 money borrowed balance instead of the beginning of the year balances. (The same balances as the prior year ending money borrowed.) Now fixed.
Accounts Payable Fix: The date acquired on the record just before “Add New” was clicked sometimes the date acquired would change.
Write Checks: Added the total Amount of the checks marked to print. This appears at the top of the Accounts Payable check marking screen.
Money Borrowed Report: The column for Maturity (“MTRTY”) was not printing single digit years correctly.
Checkbook Reconciliation: When the computed checkbook balance was incorrect, you could enter a new balance, but the computer never saved the new balance. Now the new adjustment is used throughout the year.
Monthly Transactions Dates - Check Numbers - Item Codes
Monthly Check Numbers: -Added number spinner (arrows or plus-minus keys) so if the auto check numbering is not correct because of voided checks, you can just click up a few numbers rather than having to re-key the whole number.
Correcting an Item Code in Monthly - On existing records, it’s sometimes necessary to change an item code. If you click in the field, it reacts as though you want to change just one number. Most customers prefer to retype the complete 3 digits for a new code. Pressing the F2 key darkens the item code cell so you can reenter the 3 digits.
A quicker way is to double click in the item code cell to darken for correcting all the digits. This technique works for Enterprise codes too! A third method is to click & hold down the button at the end of the cell & drag the mouse to the beginning
Removable Drive Letters: Expanded the drive letters to be D-R. Letter J was missing, but now all letters DR are usable.
Delete Farm after Backup: This question always appeared after a save to a floppy or removable media. Since the most common reply is NO, this question no longer is asked. For shared computers, it can be turned on by the user.
Includes Improvements made in Version 5F (Released January 2006)
Backup your data to Removable Media: Many new computers come standard without a floppy disk drive.
You can Load & Save your data to CD’s, USB Flash Drives, USB Jump Drives, USB Memory Sticks, USB Thumb Drives and Zip drives. The drive letters D through L are enabled for this purpose. Many years worth of data can be stored on one USB Drive. You can switch back & forth using different devices if you want. You can still use floppy disks too!
What's the best back up media?
With Windows 7, (Windows 8 not available at the time of this release) Vista or XP, many of the CD or DVD drives are designed to store photos or play movies. It’s easy for you to attempt to backup your data onto the wrong form of media. For best results we recommend the USB Flash Drives, USB Jump Drives, USB Memory Sticks, USB Thumb Drives. These drives do not require formatting prior to use.
Close the Year Fixes
Checkbook Balances: Some customers that had loans setup belonging to a specific checkbook (i.e.:CB#1). When payments were made from a different checkbook the payments from the non owner checkbook (i.e.: CB#2-5) were ignored. This resulted in the beginning money borrowed balances for the new year to be incorrect. Even though the End of the year money borrowed report was correct. The sum of all the checkbook balances was correct, but the individual checkbooks showed up with incorrect balances. This is now fixed in version 5F.
Cash Flow & Item Code Points: Version 5E.3 treated transactions with points incorrectly when automatically creating a Cash Flow for the new year. Also two transactions with the exact same information caused one of them to be used & the other ignored. Now handled correctly.
Checkbook Reconciliation: Some checks that were marked cleared were still being rolled over to the new year & there was no way to get rid of them. Now handled correctly in 5F.
Vendor Input Screens: The zip code pick lists for General, Money Borrowed & Labor have been refined. Version 5E didn’t always let you fix a mistake. Adding a new item to the list now lets you change it to blank if you previously had a value.
Trouble Shooting: Added more cleaning up of your data. If you have too many reports listed in your report printing menu, they will be removed when you go to “7. More Options”, “ 5. Trouble Shooting”, “5. Fix Corrupted Farm”. Also if you have trouble with Accounts Payable, running “Fix Corrupted Farm” may correct the problem.
Double Click in the Item Favorites List: Currently when you already have an item and an item code in the Item Category/Item cells, then click on a favorite, only the item code changes. But what if I wanted the category name to change too? The solution is to Double click. A double click will replace both the item category name & the item code.
View/List Sort Order: The last sort order within a session is remembered so that each time you click View/List, the list is in the same order as the previous sort. So if you want the sort on Vendor it always stays on Vendor until it’s resorted. If you sorted on $ amount then it always stays sorted by $ amount until a new sort is requested.
Licensing Problems: Some customers experienced difficulty licensing version 5E. It was necessary go back to the older version 5D.2 until we found a solution. The licensing has been changed so it will not get the “Failure to send license over your network error”. There are still some anti-spy ware programs that you should not use or they should be modified to leave your Ultra Farm Folder alone. The following programs may cause you problems. Adaware, Webroot Spy Sweeper, Norton Speed Disk, & Disk Keeper.
Includes Improvements made in Version 5E (Released December 2004)
Close the Year Fixes:
1. Personalized item points failed to copy over into the new year.
2. Check writing custom check settings failed to copy over into the new year.
3. The check writing last check number used failed to copy over into the new year.
4. Payroll checks not cleared failed to copy over into the new year.
Money Borrowed: Loans are setup belonging to a specific checkbook (i.e.:CB#1). When payments were made from a different checkbook the payments from the non owner checkbook (i.e.: CB#2-5) were ignored. This resulted in the beginning money borrowed balances for the new year to be incorrect. Even though the End of the year money borrowed report was correct.
Cash Flow Plan: A cash flow plan made for the new year and then modified was getting unexpectedly changed on close the year. Only Expense cash flow plans remained intact after a year end close. This problem only became apparent if you chose Keep Existing Plan when you closed the year.
Item Codes & Enterprise Codes Pick list: The pull down lists for Item/Category Description; Item code; and Enterprise Code have been changed to match your favorites. The reason for this is so the pick list is not so long and filled up with items/enterprises not important to the user. If you key in a code that’s available but not one of your favorites, a message box is displayed with the option to add it to your favorites. To clean up your favorites you can go to “Input Information”, “Personalized Descriptions” from the Main Menu.
Print your Favorite Item Codes & Enterprises: After modifying your Personalized Items or Enterprises, you may want to print them to keep with you for handy reference. There are many different styles & sequences. You can print to the screen prior to printing on paper. A print button was added to the bottom of the screen.
Check Number Stuck: The automatic check number incrementing was completely redesigned in an attempt to eliminate this frustrating Microsoft bug. If you choose to not use a check number, then the program will not try to make you use a check number again until you key one in.
Checkbook Reconciliation: The default check book is #1. We fixed a bug that if you printed the report, the total printed could be missing the last outstanding check unless it was marked cleared, but the screen was OK. This is fixed in 5E.
View/List Sort Order: The last sort order within a session is remembered so that each time the user clicks View/List, the list is in the same order as the previous sort. So if you want the sort on Vendor it always stays on Vendor until it’s resorted If you sorted on $ amount then it always stays sorted by $ amount until a new sort is requested.
Key the point without the Mouse: In an attempt to make the monthly data entry faster, we purposely did not allow the cursor to stop on the point (sub-account after the item code) instead we expected the user to use the mouse. We caught hell from those customers that key the point frequently. They didn’t want to take their hands off the keyboard.
To make the cursor stop on the Item Code "point" Press F7. F7 activates the stop on the "point" condition. When the stop on point is active the point column will be yellow. Press F7 anytime to turn the stop OFF so the cursor no longer will stop there. The mouse can be used at any time if you prefer.
Vendor Input Screens: The city, state & zip pick lists for General, Money Borrowed & Labor have been refined. Version 5D.2 didn’t always add a new item to the list and may not let you change it to blank if you previously had a value. The city name was treated as two different cities if the first letter was a capital letter (upper case) as opposed to a small letter (lower case).
Add New Reminder: With Ultra Farm for Windows all your records are saved automatically when you quit data entry.
Depending on how you quit, we found that some customers wanted a reminder to click the Add New button. The next time you start a monthly transactions input session, a reminder message will pop up for the expense screen only. (It always starts with expense for checkbook 1).
If you finish the detail line (you last keyed the $, enterprise, quantity or head) and clicked Quit, then the next time you launch Ultra Farm to key monthly records, the program brings you to the last place you were when you quit. If you are not careful, it’s easy to type over the last entry by mistake. In this case the program will provide a friendly reminder that you need to click Add New before entering new records.
If you finish the detail line (you last keyed the $, enterprise, quantity or head) and clicked Add New, then clicked Quit, the next time you launch Ultra Farm to key monthly records, the program brings you to the last place you were when you quit. In this case you never keyed anything into this record when you quit so it’s OK to start keying onto this screen. The program does not offer any reminders in this case.
In Summary: Income, payroll, and both Non cash Tabs (when clicked) will not show a message. They work the same as version 5D.2 If you click these Tabs and click back to Expense the message will not show.
The message will show when the last transaction you keyed on the previous session was an expense screen that had an item code & dollar amount displayed when you quit (exited).
From the Data Entry Expense screen if you click View/List, then View/Edit you will not see the message. But if you click View/List, then Data Entry you will see the message.
The message goes away once you click Add New for the expense screen.
Report Printing Menu: Prevented the user from getting in a “locked up” condition. This was caused by accidentally adding several reports with no name and getting a “Report Type” of blank which sometimes gave an error message about a validation rule and wouldn’t let you continue.
Inventory Report: Corrected market/cost values for livestock sold to be -0- instead of the original value before sale.
Trial Balance Report: Changed the sort order to be the same order as keyed when the dates are the same.
Money Borrowed Report: The printing sequence of the Money Borrowed Report was date within CB#. It’s been changed ..Now it’s CB# within date. This now matches the way our old DOS printed.
Report Added: The Cash Flow plan/actual by quarter is available from the list of reports.
Balance Sheet: The profit or loss that prints on the farm P&L is now transferred to the equity section of the balance sheet if no user input is detected.
Fin Pack Export: Added the 2 missing files that were absent on version 5D.2.
Check Writing Fixes: Blank Item descriptions no longer puts check writing in an endless loop.
If a vendor ID in General is the same as one in Money Borrowed and you are writing a check for both of them, a warning message tells the user the amounts will be added together.
Mark checks to print now sorts by due date within vendor.
Close the year with 5D.2 did not copy the custom check style & next check # into the new year. This is fixed on version 5E.
Duplicate detail item codes, description & amount were being combined in the total but only one detail line printed on the stub. Now fixed in 5E.
Accounts Payable: When using the view/list, the Vendor sort didn’t work. This is now working correctly.
Get Your complete Ultra Farm Version 7K CD that is Windows 10/11 Compliant Plus all prior updates for only $285.00 and continue getting Free Technical Support when you update.
For all of you Growers, be sure to take a look at the free "My Field" Crop and Field History Demo". "My Field" Crop Records is designed so you can input as little or as much information as desired. Each producer can utilize different components in such a way as to satisfy their individual needs. Extremely easy to use.
"My Field" monitors your Seed, Fertilizer & Chemical costs per crop, field, and acre. Landlord Reports for cost sharing are available. It can utilize FSA or Goggle Earth Maps (optional). Chemical tank mix formulations are automatically calculated. "My Field" is EPA compliant. The Break–even analysis reports by crop or field. Benefit from the history it keeps for multiple years.